
Plan and create sales campaigns
Save and deploy sales campaigns
Overview and functionality
POLUMANA® sales planning provides you with a comprehensive tool for placing your campaigns in a targeted and customised manner. The polumana sales campaigns contain the following components, among others:
- Generate new items independently of the daily data workflow of your source system
- Precise placement of items for specific customer groups
- Offers depending on customer areas
- Freely selectable prices and discounts independent of your normal pricing
- Freely selectable minimum and maximum quantities
- Define the duration of the campaigns through a validity range
Plan and create sales campaigns
Like all other editorial content, sales campaigns are managed via the settings. To do this, tap the ‘Manage objects’ button on the Login/Databases tab.
Another dialogue opens. Here you select Sales campaigns and click on the icon for Add object. Existing campaigns can be edited using the pencil icon.
| WIN | Function |
 | Change an existing object |
| Add new object |
You are now in the entry screen for sales campaigns. You have the following options here:
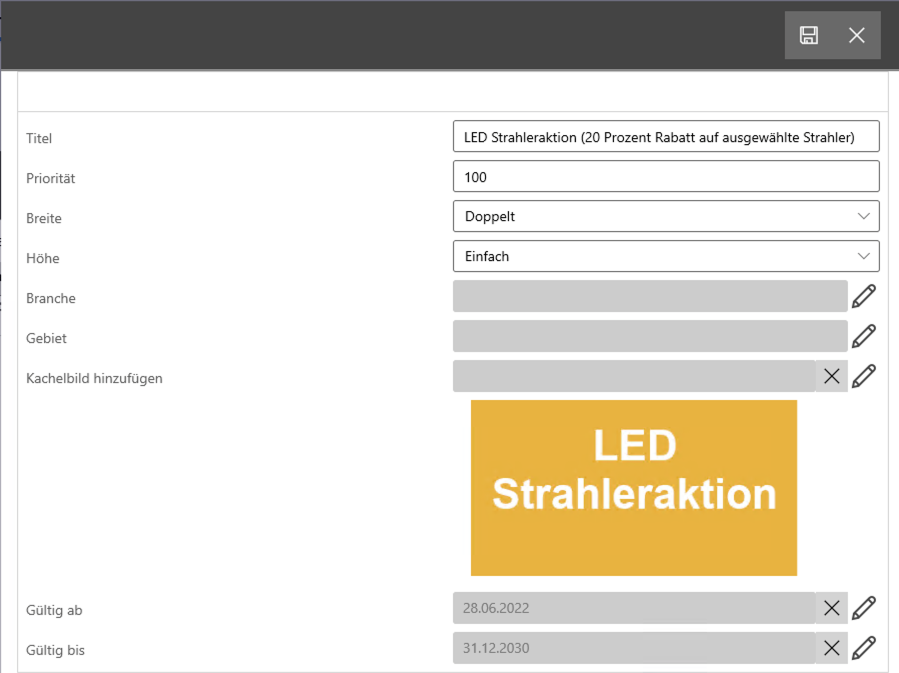
Title: What is the name of your sales campaign? Please note that this name is only used for orientation within the admin area. It is not the name that will appear on the tile.
Priority: If you have several campaigns, you can specify the placement of the campaign here. Priority 1 means that this campaign will be displayed first on the home screen.
Width/height: Here you enter how large the tile image should appear.
Industry: Enter a specific industry for which this sales campaign applies. The campaign is only displayed on the home screen if a customer is assigned to this industry.
Territory: Enter a specific territory for which this sales campaign applies. The campaign will only be displayed on the home screen if a customer is located within this area.
Add tile image: Use the pencil icon to add an image that is relevant to the sales campaign.
Valid from/valid until: The sales campaign is displayed within this period.
Add product information
The first part of your sales campaign is now complete. The next step is to add further product information to your campaign.
Title: Name of the additional product information
Preview: You can set a preview image here.
Content: The content is opened when you click on the preview image. The content can be any object. Preferably a PDF or another image.
 You can add as much product information as you like to your sales campaign. To do this, repeat the steps listed above.
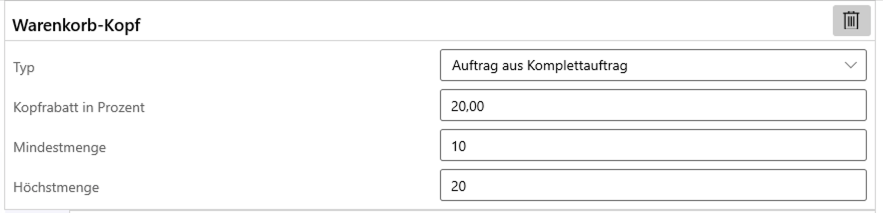
Define shopping basket
Click on ‘Add to shopping basket’ to create a shopping basket. Within the shopping basket you can manage the following components, which apply to the entire shopping basket:
- Discount on entire shopping basket
- Order type
- Minimum and maximum quantity for the entire shopping basket
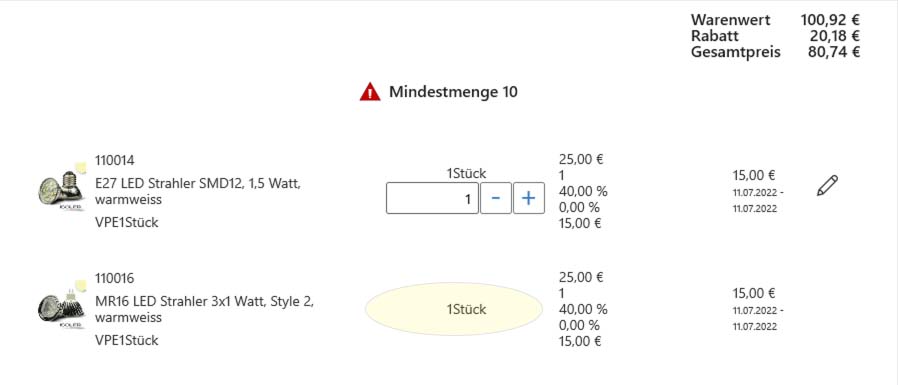
Then define the items in the shopping basket yourself by clicking on ‘Add shopping basket items’. The following fields are available here:
- Label: Enter a name for this item here
- Changeable quantity: Should the specified quantity be changeable?
- Minimum and maximum quantity for this item
- Default: Tick this checkbox so that this item is selected in the shopping basket in the event of multiple selection (see below).
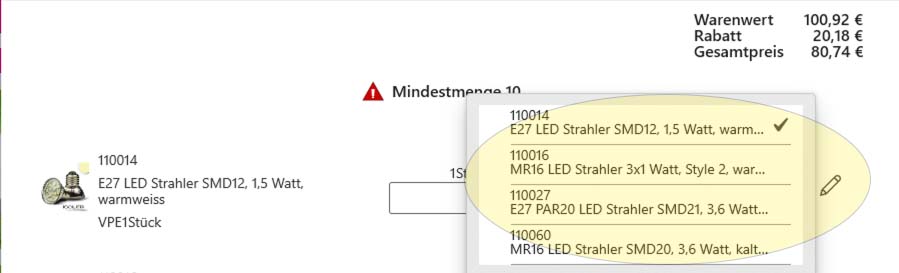
If you want to make several items available for selection within one item, add several shopping basket items to this item. As a result, a pencil for selecting items is displayed on the right-hand side of the shopping basket item in the sales campaign. Click on this pencil to display all the items added to this item.
Adding add-ons
Add-ons can be added to the shopping basket by clicking on ‘Add-ons’. Use the ‘Label’ field to name the addition in the shopping basket accordingly.
Save and deploy sales campaigns
The campaign is now available. Go to the start page and click on the Sales campaigns tab. You will now see the campaign you have created. Click on the ‘Next’ button to see a preview of the shopping basket. Here you can now change the shopping basket according to your definitions. When you click on the ‘Done’ button, a shopping basket is automatically created. This shopping basket can no longer be changed. However, you must release the shopping basket as usual.
